What is a Logical Volume Management?
The Logical Volume Management (LVM) of Centos is very helpful in the later operation to be able to increase partitions without further problems, completely without maintenance window. If you install an Centos you have the opportunity to configure the LVM.
The LVM combines hard disks or partitions (Physical Volume, PV) into a pool (Volume Group, VG) from which „partitions“ (the Logical Volumes, LV) can be dynamically requested. The file systems are created on these logical volumes.
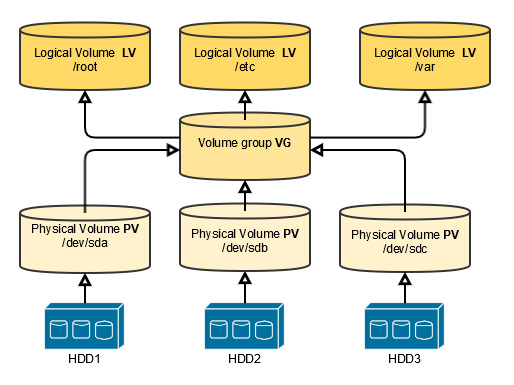
A VG can be expanded by adding PVs, and LVs can extend across multiple physical volumes within the volume group. Thus, a logical volume can be many times larger than the largest disk in the system.
The most important advantages of LVM compared to traditional static partitioning of hard disks are the possibility to subsequently enlarge a file system. For this purpose, the VGs, which can also be expanded subsequently, are expanded by adding PVs (hard disks). The additional storage space now available can then be allocated to the LVs, which can also be expanded later, as required. Afterwards the file system must be extended by the newly available storage space – whereby this is not possible for all file systems without problems afterwards. Under most operating systems the enlargement of a logical volume and the file system created on it is also possible during operation without applications running on it being affected by the enlargement. What different file systems are in Centos and what is the most useful i explain it in another article.
Basically, it is not necessary to keep track of the physical volumes on which a logical volume will be located, because the distribution to the physical volumes within a volume group is done automatically by the LVM. For performance-critical applications, however, care can be taken to distribute simultaneous disk accesses to different physical volumes in order to optimize the movement of the read and write heads. In addition, it is common practice to control distribution so that a logical volume is not distributed among too many physical volumes. In this way, the effects of a hard disk failure can be limited. LVMs usually have appropriate commands to check and change the distribution of data among the physical volumes during operation.
Creating a new Logical Volume Management
Prepare the physical volume
With fdisk,gdisk,parted you create a new partition for use with LVM. Always set the partition type to Linux LVM.
In my example i show you with fdisk and a new HDD i have added to my virtual machine.
With fdisk -l you can see your different disk partitions. I have # around my new HDD. So it is easier for to see. It is the third HDD that’s why it is /dev/sdc.
[root@vmtmucentos ~]# fdisk -l

Disk /dev/sda: 8589 MB, 8589934592 bytes, 16777216 sectors
Units = sectors of 1 * 512 = 512 bytes
Sector size (logical/physical): 512 bytes / 512 bytes
I/O size (minimum/optimal): 512 bytes / 512 bytes
Disk label type: dos
Disk identifier: 0x00004424

   Device Boot      Start         End      Blocks   Id  System
/dev/sda1   *        2048     2099199     1048576   83  Linux
/dev/sda2         2099200    16777215     7339008   8e  Linux LVM

Disk /dev/sdb: 357 MB, 357913600 bytes, 699050 sectors
Units = sectors of 1 * 512 = 512 bytes
Sector size (logical/physical): 512 bytes / 512 bytes
I/O size (minimum/optimal): 512 bytes / 512 bytes
Disk label type: dos
Disk identifier: 0xe6b7b2e1

   Device Boot      Start         End      Blocks   Id  System
/dev/sdb1            2048      699049      348501   8e  Linux LVM

######################################################################
Disk /dev/sdc: 219 MB, 219320832 bytes, 428361 sectors
Units = sectors of 1 * 512 = 512 bytes
Sector size (logical/physical): 512 bytes / 512 bytes
I/O size (minimum/optimal): 512 bytes / 512 bytes
######################################################################

Disk /dev/mapper/cl-root: 6652 MB, 6652166144 bytes, 12992512 sectors
Units = sectors of 1 * 512 = 512 bytes
Sector size (logical/physical): 512 bytes / 512 bytes
I/O size (minimum/optimal): 512 bytes / 512 bytes


Disk /dev/mapper/cl-swap: 859 MB, 859832320 bytes, 1679360 sectors
Units = sectors of 1 * 512 = 512 bytes
Sector size (logical/physical): 512 bytes / 512 bytes
I/O size (minimum/optimal): 512 bytes / 512 bytes


Disk /dev/mapper/cl-data: 104 MB, 104857600 bytes, 204800 sectors
Units = sectors of 1 * 512 = 512 bytes
Sector size (logical/physical): 512 bytes / 512 bytes
I/O size (minimum/optimal): 512 bytes / 512 bytes
With fdisk /dev/sdc i go directly in the partitioning tool. And i make the following steps.
- n
- press enter – default is p for primary
- press enter – default is partition 1
- press enter – default is the first possible sector
- press enter – default is the last sector
- t
- Hex Code for LVM is 8e
- w
Here are the steps on my console.
[root@vmtmucentos ~]# fdisk /dev/sdc
Welcome to fdisk (util-linux 2.23.2).

Changes will remain in memory only, until you decide to write them.
Be careful before using the write command.

Device does not contain a recognized partition table
Building a new DOS disklabel with disk identifier 0x51194acd.

Command (m for help): n
Partition type:
   p   primary (0 primary, 0 extended, 4 free)
   e   extended
Select (default p):
Using default response p
Partition number (1-4, default 1):
First sector (2048-428360, default 2048):
Using default value 2048
Last sector, +sectors or +size{K,M,G} (2048-428360, default 428360):
Using default value 428360
Partition 1 of type Linux and of size 208.2 MiB is set

Command (m for help): t
Selected partition 1
Hex code (type L to list all codes): 8e
Changed type of partition 'Linux' to 'Linux LVM'

Command (m for help): w
The partition table has been altered!

Calling ioctl() to re-read partition table.
Syncing disks.
[root@vmtmucentos ~]#
Now i can see my new partition with fdisk -l as an Linux LVM partition.
[root@vmtmucentos ~]# fdisk -l | grep sdc -A5 -a1

Disk /dev/sdc: 219 MB, 219320832 bytes, 428361 sectors
Units = sectors of 1 * 512 = 512 bytes
Sector size (logical/physical): 512 bytes / 512 bytes
I/O size (minimum/optimal): 512 bytes / 512 bytes
Disk label type: dos
Disk identifier: 0x51194acd
--
   Device Boot      Start         End      Blocks   Id  System
/dev/sdc1            2048      428360      213156+  8e  Linux LVM
Create a physical volume
The command pvcreate is used to label the partition for use with LVM. A PV is divided into physical extents (PE) of a fixed size, for example 4MiB blocks.
[root@vmtmucentos ~]# pvcreate /dev/sdc1
  Physical volume "/dev/sdc1" successfully created.
Create a volume group
vgcreate is used to create a pool of one or more physical volumes, called a volume group.So i could take /dev/sdc1 and an new HDD /dev/sdd1 together. The size of the VG is determined by the toral number of physical extents in the pool. A VG is responsible for hosting one or more logical volumes by allocating free PEs to a logical volume. Now we can create a volume group with a name and my PV. You can check it with vgs.
[root@vmtmucentos ~]# vgcreate testvg /dev/sdc1
  Volume group "testvg" successfully created
[root@vmtmucentos ~]# vgs
  VG     #PV #LV #SN Attr   VSize   VFree
  cl       2   3   0 wz--n-   7.32g 236.00m
  testvg   1   0   0 wz--n- 204.00m 204.00m
[root@vmtmucentos ~]#
Create a logical Volume
lvcreate creates a new logical volume from the available physical extents in a volume group. Use theses argumens as minimum
- -n (to set the LV name)
- -L (LV Size in bytes)
- the VG name for the LV
[root@vmtmucentos ~]# lvcreate -n testlv -L 100M testvg
  Logical volume "testlv" created.
[root@vmtmucentos ~]# lvs
  LV     VG     Attr       LSize   Pool Origin Data%  Meta%  Move Log Cpy%Sync Convert
  root   cl     -wi-ao----   6.20g
  swap   cl     -wi-ao---- 820.00m
  testlv testvg -wi-a----- 100.00m
I have created an LV with the name testlv and a size of 100MB. You can see the attributes an an „O“ is missing. This means „Online“. At the moment my system don’t know about my LV and can’t use it. In the next steps we have to make an filesystem on it and we have to mount it.
*******************************
IMPORTANT
Different tools will display the logical volume name using either the traditional name,/dev/vgname/lvname, or the kernel device mapper name /dev/mapper/vgname-lvname
*******************************
Add filesystem
We now have the possibility to use different file system types. In my example I use an xfs, which also brings many advantages in later operation. For example the extension of the file system during runtime.
With mkfs.xfs i can create an xfs filesystem.
[root@vmtmucentos ~]# mkfs.xfs /dev/mapper/testvg-testlv
meta-data=/dev/mapper/testvg-testlv isize=512    agcount=4, agsize=6400 blks
         =                       sectsz=512   attr=2, projid32bit=1
         =                       crc=1        finobt=0, sparse=0
data     =                       bsize=4096   blocks=25600, imaxpct=25
         =                       sunit=0      swidth=0 blks
naming   =version 2              bsize=4096   ascii-ci=0 ftype=1
log      =internal log           bsize=4096   blocks=855, version=2
         =                       sectsz=512   sunit=0 blks, lazy-count=1
realtime =none                   extsz=4096   blocks=0, rtextents=0
[root@vmtmucentos ~]#
I have to use my device mapper name.
Create Mountpoint
First we have to create our directory where we want to point our new LV.
Then we have to mount it.
[root@vmtmucentos /]# mkdir test
[root@vmtmucentos /]# mount /dev/mapper/testvg-testlv test/
[root@vmtmucentos /]# df -h
Filesystem                 Size  Used Avail Use% Mounted on
/dev/mapper/cl-root        6.2G  4.0G  2.3G  64% /
devtmpfs                   482M     0  482M   0% /dev
tmpfs                      497M     0  497M   0% /dev/shm
tmpfs                      497M  7.0M  490M   2% /run
tmpfs                      497M     0  497M   0% /sys/fs/cgroup
/dev/mapper/cl-data         97M  5.2M   92M   6% /data
/dev/sda1                 1014M  173M  842M  17% /boot
tmpfs                      100M     0  100M   0% /run/user/0
/dev/mapper/testvg-testlv   97M  5.2M   92M   6% /test
[root@vmtmucentos /]#
We see under /test our 100MB from LV. This is not permanently. So that the Mountpoint is still available after a restart we must make an entry in the fstab.
[root@vmtmucentos /]# vi /etc/fstab
/dev/mapper/testvg-testlv /test xfs defaults 0 0
With mount -a we can test it. Mount -a mounts all points what is in the fstab.
An that’s it. Congratulations!